One of the coolest things about Snapchat is that you can add various effects to your photos and videos.
To get face effects on Snapchat, you might consider using lenses (i.e. face effects), applying filters, trying the face-swapping feature, adding typed text, decorating with stickers or emoji, or using the drawing feature. Experiment with different options, have fun, and see what you can come up with!
Part 1: Using Lenses (Face Effects)
1. Understand What the Lenses Feature Offers
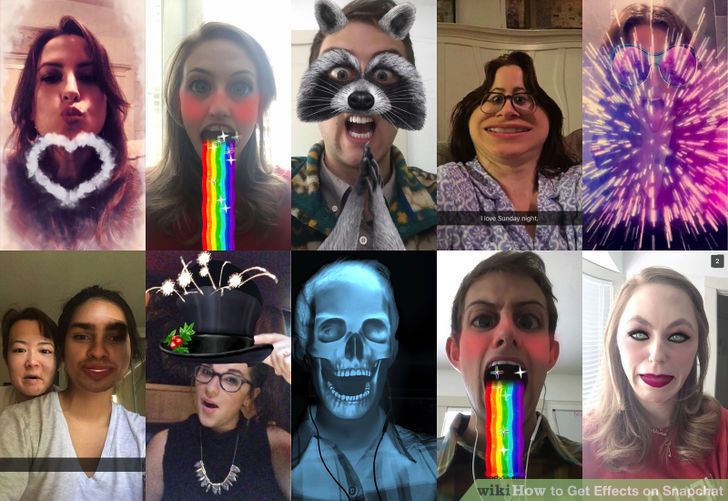
The most recognizable Lens on Snapchat was also one of their first: puking rainbows. Since then, Snapchat has continued to push out new Lenses regularly — face swapping, various animal faces, character transformations, facial contortions, “Birthday Party,” and more.
What are Snapchat Lenses?
Lenses are special effects that are applied in real-time using face detection, so you can watch how your actions affect the Lens on screen live. As Lenses are often interactive, you may have to match a certain motion in order to produce a certain effect (e.g. open your mouth for the rainbows to continually waterfall out). There are 10 free, featured Lenses per day, and they change. If you did purchase any Lenses when that was an option, those are permanently available to you.
When Can You Use Lenses on Snapchat?
You use Lenses before you take or record your Snap, while filters are added after you take the Snap. You can use both Lenses and filters on the same Snap.

2. Acknowledge the Mobile Device and Hardware Limitations of Lenses
Lenses do not work with the majority of Android smartphones, and only with recent iPhones (though there have even been reported inconsistencies with recent iPhones). If you don’t have a new device, there’s a good chance that you won’t be able to get Lenses to work, and even if you do there is a chance it just may not work.
The iPhone 4 and first-generation iPad are not supported. However, various supported devices have had some users report that the feature does not work for them.
Lenses requires Android 4.3 or later for Android devices. Even with the latest updates, some users report that the feature still will not work.

3. Update Your Snapchat
You’ll need to make sure that you’re running the latest version of Snapchat to access Lenses. You can update Snapchat from the App Store or Google Play Store.
For details on how to upgrade Snapchat, click here.
4. Switch Snapchat to Selfie mode
Lenses works by recognizing a face and then morphing it with effects. You can use it with either your forward-facing or rear-facing camera, but you may find it easiest to test with the front-facing camera. Opening the app will take you directly to your main camera. There are two ways to access the forward-facing camera:
1) Tap on the top right icon (a circle enclosed by two arrows), this will give you access to your forward-facing camera, or…
2) Simply double-tap the screen to switch between cameras.

5. Hold your phone away so you can see your entire face
Lenses works best when you can see your entire face in the frame.
Also, make sure the lighting is decent, otherwise this may hinder the facial recognition.

6. Press and Hold Your Face on the Screen until the Whole Geometric Shape Is Complete
After a moment, your face will be scanned and the Lens options will appear at the bottom of your screen.
Make sure that your entire face is in the screen, and that you’re holding the camera still. You may have to press and hold for several seconds or try a few times until the feature turns on. If you only see portions of the geometric shape covering your face, this may be due to your lighting.

7. Select the Lens You Want to Use
Swipe left and right to select from the Lenses available. Snapchat rotates the Lens selection on a daily basis, so there are always new choices.
• Some of the popular Lenses that you’ll likely encounter include puking rainbows, screaming, zombie, “in love,” and crying.
• “Birthday Party” Lens is activated on your birthday (if you’ve included your birthday details in the app under the Settings section). You can also access this Lens when it’s a friend’s birthday — simply look for the cake icon next to their username to indicate their birthday, and tap the cake icon to get access to the Lens right away.
• Because of the rotating selection, the Lens you are looking for may not be available. Check back in the next day or two to see if it has become available again.
8. Follow the Instructions for the Lens You Chose
Many Lenses will display a quick command to make the effect happen. For example, to do the puking rainbow you’re prompted to open your mouth.
9. Take or Record a Snap
Once you’re ready, you can tap the Capture button on the bottom (in this case it will have the image of the feature you select) to take a Snap (photo), or press and hold it to record a video (up to 10 seconds). Your Lens effect will be recorded in the Snap.
• For photos, on the bottom left you will see an icon of a ‘5’ with a circle around it. Tap that to select the number of seconds (up to 10) you would want your photo to last for when being viewed.
• Android devices must be running 5.0 or later to record video Snaps with Lens effects. The iPhone 4, 4S, and iPad 2 are not supported. Even with compatible devices, there have been reports of the feature not working for some users.
• Consider adding additional effects (text, drawing, emoji and stickers). All the other effects can still be applied onto a Snap that’s used the Lenses feature (as explained in the other sections).

10. Send Your Snap
Once you’ve captured your Snap, you can send it to the Snapchat contacts you select, post it to your public story (visible for 24 hours), or just save the photo/video without posting just like you would any other Snap.
• The second icon from the left on the bottom with an arrow and line will save the photo/video without posting it.
• The third icon from the left on the bottom with a box and a plus will only post it to your public story, which is available to anyone that is following you for 24 hours.
• The arrow icon on the bottom right will allow you to select the people you want to send your snap to, and also select your public story “My Story” should you choose to.
• After you select an option, another arrow will pop-up at the bottom in blue; tap to send.